To contact us Click HERE
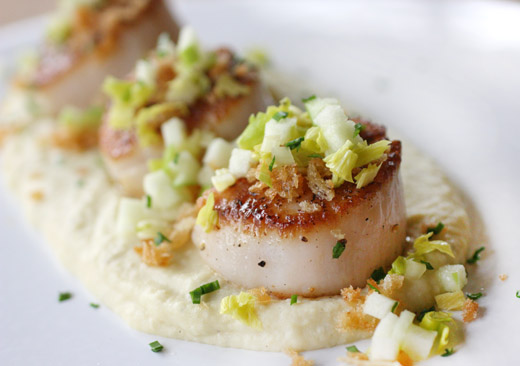
This is a Goldilocks story. I was looking for something to make for a weekend dinner that would be kind of a special meal. I had just finished reading, and cooking a few other things from, the brand new Barefoot Contessa Foolproof book. In it, there’s a Seared Scallops and Potato Celery Root Puree dish that sounded delicious. Even though the dish seemed perfectly lovely, I wanted something just slightly more dressed up, more special, more this-isn’t-your-usual-weekend-dinner-at-home. A few days later I was flipping through Stir: Mixing It Up in the Italian Tradition which is full of great ideas and has never disappointed. There, I found a very similar dish called Scallop and Pureed Celery Root Gratinee. This was a dolled up version of the same thing with just a few differences. It was topped with crispy breadcrumbs, finely diced Granny Smith apple, and a celery emulsion. It was beautiful in the photo. But, I realized I didn’t really want to fuss with a celery foam. I can be hard to please. I picked my favorite parts of each dish from both books, and voila. I went with Ina’s version of the puree which included leeks and potato and was cooked in cream. Then, after pureeing it, I pushed it through a fine-mesh strainer just like Barbara Lynch suggested for a velvety smooth finish. I topped the seared scallops with buttery breadcrumbs and diced apple as shown in Stir, but instead of a celery foam, I used finely diced celery. The last detail was Ina’s drizzle of olive oil. And, dinner was just right.
This is what the cooking entailed: Chopped leeks were sauteed in butter, and diced peeled potato and celery root were added along with cream and salt and pepper. I used two and half tablespoons of butter, two chopped leeks, two Yukon gold potatoes, one celery root, and one and a half cups of cream. This was brought to a boil and left to simmer for about 25 minutes until the potatoes and celery root were very tender. The cooked vegetables and cream were transferred to a food processor and pureed until smooth. Then, I scooped the puree into a fine-mesh strainer and pushed it through using a metal spoon. The strained puree was kept warm in a saucepan over low heat. The scallops were patted dry, seasoned with salt and black pepper, and seared in grape seed oil over medium-high heat for about three minutes per side. To top the scallops, panko breadcrumbs were toasted in melted butter, Granny Smith apple and celery were finely diced, and chives were chopped. Once plated, Ina recommends drizzling the scallops with basil oil, but I used a plain, extra virgin olive oil.
I never would have thought to pair Granny Smith apple with scallops, but it was a fantastic idea. The tartness of the apple functioned just as a squeeze of lemon would but added a little crunchiness as well. During dinner, we argued as to whether the apple, celery, and breadcrumb toppings were better with the scallops or the potato and celery root puree. They were great with both, and I wouldn’t change a thing when I make this again.
I am a member of the Amazon Affiliate Program. Pin ItTweet
what is blueberry
25 Şubat 2013 Pazartesi
Dark and Stormy Fresh Ginger Gingerbread
To contact us Click HERE
On a day when I wanted to make dessert but didn’t want it to be an all-day project, this was the perfect cake. It’s from Sinfully Easy Delicious Desserts which is full of great desserts that don’t take all day to make. I was drawn to the idea of a quick gingerbread made with fresh ginger, and the variation suggested in the side-bar sealed the deal. That variation was to replace some of the water in the recipe with dark rum to match the flavors in a Dark and Stormy cocktail. So, not only was this cake whipped up in record time by mixing everything in a food processor, adding a little Gosling’s Black Seal rum took me back to that pretty, pink sand and that sparkling, blue water of Bermuda on a January day. Alice Medrich also offers all sorts of great ideas for garnishing desserts, and there’s even a page of “Things to do with gingerbread” that lists accompaniments like lemon whipped cream, dessert chutney, and fruits in syrup. Sticking with the Dark and Stormy theme, I topped mine with grated lime zest and poured a little more rum over the mascarpone whipped cream.
The only slightly time-consuming task here was peeling some fresh ginger. You need to peel and slice enough to fill one-half cup. Then, the fresh ginger was finely minced in the food processor. Next, brown sugar, cinnamon, ground dried ginger, allspice, cardamom, salt, molasses, butter, an egg, rum, water, flour, and baking soda were added. In all of about 15 seconds, the batter was done. The cake baked in an eight-inch square pan for about 30 minutes. I whipped mascarpone and cream with a scant bit of sugar and washed a lime for zesting. Once the cake was cool, it was ready to be topped with the lime zest, some whipped cream, and a drizzle of more black rum.
Ginger and molasses have become a couple of my favorite ingredients in recent years, and they’re especially good in the wintertime. They’re also quite good with the flavor of rum. Admittedly, our winter hasn’t been too harrowing, but still, a dessert that brought back memories of Bermuda was a welcome idea.
I am a member of the Amazon Affiliate Program. Pin ItTweet
Walnut Spice Cake with Chocolate Fudge Frosting
To contact us Click HERE
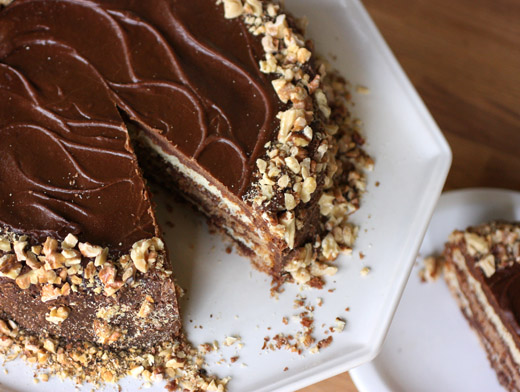
The birthday cake conversation has changed over the years. There was a time when I would ask Kurt what kind of cake he’d like for his birthday, and the answer was chocolate. No pondering, no pause, no prompts for suggestions. Just chocolate. In recent years, the answer hasn’t come quite so quickly. He still likes chocolate but wants to hear other ideas too. This year, I presented three options that I thought he’d like, and he chose this lovely, layered creation with white cake and spice cake topped with chocolate fudge frosting and chopped walnuts. It’s from Saveur, and the recipe is online. It’s simpler to make than it appears because you only mix one cake batter rather than two. After making the white batter and pouring half of it into a pan, you add spices to the remaining half before pouring that into a second cake pan. I liked that approach. And, the frosting was something new and different to me. It’s cooked on the stove and brought up to just below soft ball stage before being mixed briefly to fluff it up a bit. Then, you have to work quickly to top each layer and cover the cake before the frosting sets. Next time I make it I’ll know just how quickly it sets up and once it does, there’s no moving it. My only regret with this cake was that I didn’t really get the walnuts pressed into the sides of the cake because the frosting set so quickly. The fine powder of the walnuts stuck to the frosting on the cake sides but not the bigger pieces of nuts. In the end, I placed the nuts around the edge on top of the cake and around the bottom edge which was good enough. Kurt was happy with his choice, and I was thrilled with the spice cake flavors mingling with the chocolate fudge frosting.
Although the recipe suggests using vegetable shortening, I never use it. I used butter instead which worked perfectly well and gave the cakes better flavor. Before mixing the cake batter, dry ingredients were combined, and wet ingredients were combined separately. Also, the spices including cinnamon, allspice, cloves, and I added nutmeg were mixed in a small bowl and set aside. In a stand mixer, butter and sugar were creamed before egg whites were added. I had a laugh at the recipe which states “add egg whites one at a time.” Of course, I had already separated all six egg whites into one bowl. I just slowly added them a little at a time while mixing. Have you ever separated egg whites into separate bowls? The dry ingredients were then added in three batches with the wet ingredients being added alternately in two batches. Half the batter was poured into a nine-inch prepared pan, and the spice mix was stirred into the remaining batter before it was poured into a second cake pan. After the cakes baked and cooled, each layer was cut in half horizontally. You’ll want to have the layers sliced and ready for the frosting. To make the frosting, sugar, milk, butter, and cocoa powder were brought to a boil and cooked while stirring until the temperature reached 232 degrees F which took about 30 minutes. Then, off the heat, vanilla and baking soda were added. With a hand mixer, the frosting was mixed for only about one minute. And, then you have to work very quickly. A spice cake layer was placed on a cake stand, and it was topped with frosting. A white cake layer was added followed by more frosting. You’ll feel as you spread the frosting that as soon as it’s spread thinly, it cools and sets. Quickly, quickly, the next two cake layers were added, and the top and sides were frosted. I spent too much time making swirls on top of the cake and didn’t realize the frosting on the sides was meanwhile setting up too much for the walnuts to stick. Lesson learned.
Who knows where the birthday cake conversation will lead next year. Maybe we’ll circle back to plain chocolate. I do know that Kurt will pick his cake more quickly than I ever pick my own birthday cake. I can never easily decide what kind of cake I want, and my birthday is only a little over a month away. I should probably start thinking about this now.
Pin ItTweet
Marinated Cauliflower, Olive, and Caper Salad
To contact us Click HERE
At the tail end of cauliflower season, I’ve had enough of bubbly, gooey gratins. With spring just around the corner, I wanted to use what might be the last of our local cauliflower for something with more zip. I found a marinated cauliflower salad from Bon Appetit’s November 2003 issue, and that was just the inspiration I needed. Of course, I made a few changes by including carrots, switching up the olives, throwing in some capers, and adding some heat with crushed red pepper. But, I was thrilled with the basic idea of this mix of marinated vegetables that could top a bed of arugula for a fresh, crunchy salad of winter produce. You’ll want to start the salad either several hours or a day before you plan to serve it. The cauliflower, carrots, and olives need some time mingle in the dressing. I served it just like it appeared in Bon Appetit on a bed of baby arugula leaves, but it’s also great by itself. Or, you could top it with some toasted pine nuts and crumbled feta.
I started with a large head of cauliflower and cut the florets into pretty small pieces of about an inch or smaller. You can add the chopped vegetables to a large mixing bowl as you go. Next, a mix of olives like green and black Cerignolas and Kalamatas were pitted and roughly chopped. While shopping for these olives, I discovered that red Cerignola olives exist. I’d never seen them before. I looked it up and learned that they’re dyed red during the curing process, and I lost interest. For a moment, I thought there really was a strange, red variety of olive, but no. Carrots were sliced and celery was chopped as well. I love using the very middle stalks of celery and chopping the pale green leaves and including them too. Last, capers were drained and added to the bowl. I didn’t add any salt to the vegetables or to the dressing because of the saltiness of the olives and capers. Taste as you go to decide if you’d like any added salt. The dressing was made by whisking together apple cider vinegar, Dijon mustard, minced garlic, some fresh herbs, and crushed red pepper. Olive oil was drizzled in while whisking, and black pepper was added last. I used both chopped fresh oregano and parsley because both are currently growing in my herb garden. You could certainly skip the oregano or used dried. Half of the dressing was poured over the vegetables in the mixing bowl, and it was stirred to distribute. Cover the bowl and store the remaining dressing separately. Both should be refrigerated until ready to serve. For serving, arugula leaves were tossed with some of the remaining dressing and placed on a platter to be topped with the marinated vegetables.
The marinated cauliflower keeps well in the refrigerator for several days, and I found another great use for it that I can’t wait to show. The pops of flavor put this on the opposite end of the cauliflower spectrum from a cheese-filled gratin, and that makes it a good transitional dish on our way to spring.
Marinated Cauliflower, Olive, and Caper Salad
inspired by recipe from Bon Appetit November 2003
Dressing:
3/4 cup apple cider vinegar
3 tablespoons Dijon mustard
1 clove garlic, minced
1 tablespoon chopped fresh oregano (optional)
2 tablespoon chopped fresh parsely
pinch crushed red pepper
1 cup extra virgin olive oil
black pepper
Marinated cauliflower:
1 large head of cauliflower, cut into small florets
2 cups mixed olives, pitted and roughly chopped ( a mix of green and black Cerignola olives and some Kalamatas made a good combination)
3/4 cup sliced carrots
3/4 cup chopped celery, (middle stalks with the leaves)
1/4 cup capers in brine, drained
To assemble:
10 ounces baby arugula, washed and spun dry
In a small bowl or glass measuring pitcher, whisk together the vinegar, mustard, minced garlic, herbs, and crushed red pepper, and slowly drizzle in the oil while continuing to whisk until emulsified. Season with black pepper to taste. I don’t add salt here since the olives and capers add saltiness to the salad.
Combine all ingredients for the marinated cauliflower in a large mixing bowl. Add about half of the dressing to the vegetables and stir to combine. Cover and refrigerate overnight or for several hours. Store the remaining dressing in the refrigerator overnight as well. If you think of it, stir the cauliflower mixture a time or two to distribute the dressing while it marinates.
Remove dressing and marinated cauliflower mix from refrigerator about an hour before serving. Toss arugula with some of the remaining dressing and place on a platter. Top the arugula with the marinated cauliflower and serve.
Pin ItTweet
Vegetarian Muffuletta
To contact us Click HERE
As I put together the Marinated Cauliflower, Olive, and Caper Salad, it reminded me a lot of the kind of olive salad that’s usually on a muffuletta. The only problem for me with a standard muffuletta is that it’s usually filled with several varieties of salami and ham which all fall into the red meat category that I avoid. So, I thought, why not build a vegetarian muffuletta? I skipped the meat and sliced roasted portobellos to take its place and added a layer of piquillo peppers. I chopped the Marinated Cauliflower Salad to a smaller size before adding a generous portion to the sandwich. Just as a muffuletta should be, this was a piled-high sandwich with big flavors. I’m not sure if this version will catch on in New Orleans, but it was hit at my house for Mardi Gras.
I started with ciabatta rolls which were sliced, brushed with olive oil and toasted. From the bottom up, I layered arugula leaves, sliced provolone, roasted and sliced portobellos, and piquillo peppers. Of course, any roasted red pepper would add good color and flavor, but I had some piquillos on hand. Next up, I chopped some pepperoncini which were added before the chopped cauliflower salad. A little more arugula sat on top, and that was the sandwich.
I love how the dressing from the cauliflower salad and the brine from the pepperoncini seep into the crunchy, toasted bread and flavor the whole sandwich. And, it’s a sandwich that requires a napkin or two to be served with it, but that’s part of the charm of a muffuletta. Mardi Gras inspired this creation, but from now on, it will make year-round appearances in our sandwich rotation.
Pin ItTweet
24 Şubat 2013 Pazar
Blueberries at Farmer Mac's....Still Green!
To contact us Click HERE
Although it has been warm for weeks, the nights have still been cool. Our blueberries aren't ripening as fast as some of the other farms in the area seem to be.
It could be because of the frost damage we got that reduced our first picking across the field or just a pocket of cool weather at night around here.
Either way, the berries aren't blueing up as quickly as we would have thought.
We should be open next weekend (probably Saturday May 19) as the beginning of our season berries start turning.
Again, this is still an estimate at this time, we'll update as we see changes in the field.
And we've done a fine job of feeding the deer in the back field this year...again. The left corner of the back field had really nice berries that they thanked us graciously for eating.
Thanks for being a valued customer and friend!
Melissa
Few Blueberries at Farmer Mac's This Year
To contact us Click HERE
We posted last week that we should be opening tomorrow (Saturday, May 19).
I think the best thing to do would be to not officially open this year.
We have some blueberries that are still green, but overall, a very light crop.
However, we have eggs if you're interested in them!
What we'd like to do is to have those of you who want to come out just show up and pick what you can find on a self-serve sort of basis like we used to do on Sunday mornings.
We'd like to concentrate on growing plants and getting the farm in shape to have a good year next season.
We'll still be here and working around the farm, and will be glad to talk and show you the improvements we've made since last year and that we are continuing to work on as we progress through the calendar year of 2012.
Melissa
Kaydol:
Kayıtlar (Atom)